Beauty Tips for Women: Mistletoe Manicure

Recently I shared a swatch of Venique Lighten Up Ebenezer, a gold glitter polish that I have fallen in love with.  I decided to use it for my Christmas manicure.  The thought of mistletoe came to mind.

Here are the products I used to make this manicure: Nail Art Polish Beauty tips for Women 512
Venique – Wingtip White
Venique – Lighten Up Ebenezer
Maybelline – Bold Gold
Striper – Green
Seche Vite
Rhinestones

For the middle and ring finger I did one coat of Bold Gold then placed two coats of Lighten Up Ebenezer over that.  Used the rhinestone and green striper to make the mistletoe. Rest of the fingers got two coats of Wingtip White.  I tried to do a glitter gradient using Lighten Up Ebenezer.  This was my first attempt at a glitter gradient and it came out ok.  I have to practice the technique.
Nail Art Polish Beauty tips for Women 513Nail Art Polish Beauty tips for Women 514Nail Art Polish Beauty tips for Women 515Nail Art Polish Beauty tips for Women 516Nail Art Polish Beauty tips for Women 517Nail Art Polish Beauty tips for Women 518
I was so happy how this manicure came out.  Nail Art Polish Beauty tips for Women 519

Beauty Tips for Women: pink with a pop

The weather has been rainy and gloomy and I wanted to brighten my mood.  I decided that a bright pink with a pop on the accent finger would be the best way to go.

Here is a list of what I used for this manicure:
Salon Perfect – Fired Up Fuchsia
Salon Perfect – Summer Escape
Salon Perfect – Plum Sorbet
Salon Perfect – Bermuda Baby
Milani – White One The Spot
Rica – Whiteout
Cheeky plate – CH15

I used two coats of Fired Up Fuchsia except on my accent fingers.  On my left hand accent I did one coat of White On The Spot and left the right accent finger bare.  For the gradient I used Summer Escape, Plum Sorbet and Bermuda Baby.  I wanted to see the difference of doing the gradient on a white base and then on bare nails. I stamped the hearts image from CH15 using Rica Whiteout and topped it all off with Seche Vite.

Right hand.

Nail Art Polish Beauty tips for Women 474Nail Art Polish Beauty tips for Women 475

Left hand.

Nail Art Polish Beauty tips for Women 476Nail Art Polish Beauty tips for Women 477

I think my gradient came out better on my left hand.  Overall, I was happy on how it came out.  It definitely brightened my day.

Nail Art Polish Beauty tips for Women 478

Beauty Tips for Women: Avon Nail Art Sponge Kit

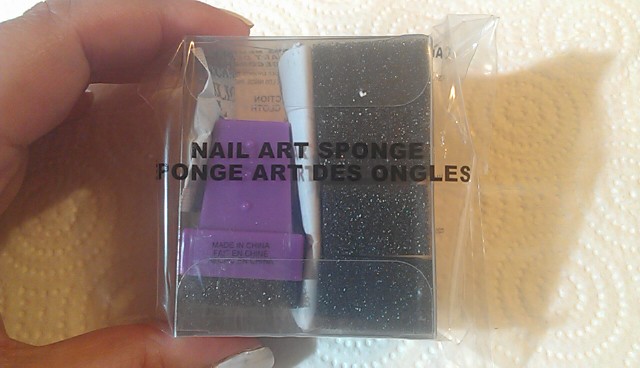
I haven’t done a beauty product review in awhile so here we go.  The beauty product review is on Avon Nail Art Sponge Kit.  I purchased this item.  It retails for a $1.99 and it comes nicely packed in a clear box.

Nail Art Polish Beauty tips for Women 405

The Avon Nail Art Sponge Kit includes 5 sponges, sponge holder, and an instruction page.  Nail Art Polish Beauty tips for Women 406

My first impression was that the sponges are not really sponges but rather foam.  If you do any crafting then you would recognize this material as the same ones for foam paintbrushes you get at hardware stores or craft stores.  The second thing I noticed was the size, it is very big.  The foam is about 1 inch across and is ½ inch deep.

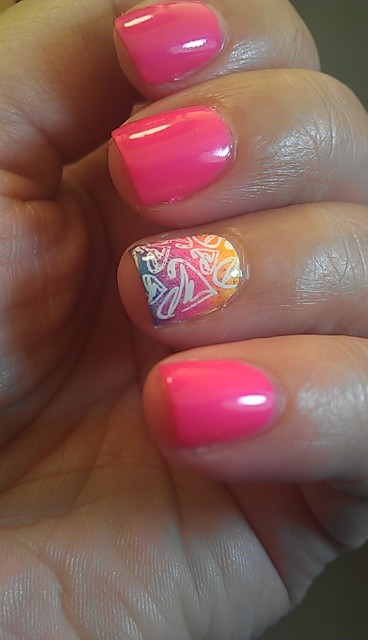
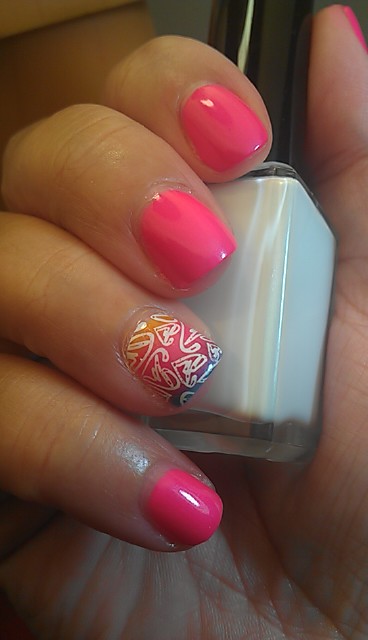
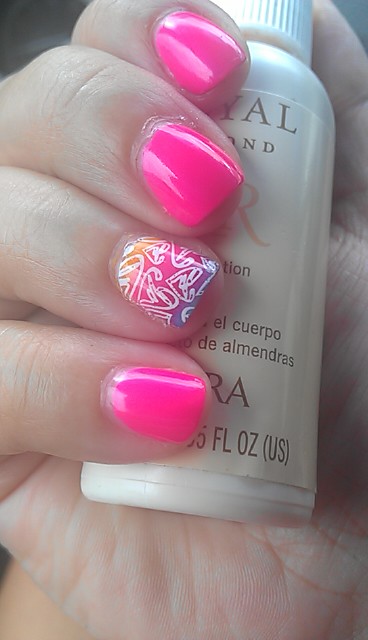
I applied a base color of white to my nails to help the colors pop.  I decided to go with a yellow to orange gradient.  The instructions say to apply the colors on paper then press the sponge into it and roll across you nails.  As you can see from the picture there is a lot of the black sponge showing through the colors.  Plus this sponge really soaks up the polish.  Again I have to point out how much larger this is than a makeup sponge, so a good portion of the sponge is not being used.

Nail Art Polish Beauty tips for Women 407

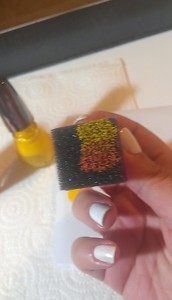
I did the rolling method per the instructions.  What I noticed was that I was getting a lot of holes with no color, almost like a Swiss cheese affect. The sponge is airy, full of way more holes than a makeup sponge.  I applied a second coat hoping to fill in the holes.  This didn’t exactly work.  The colors got more intense but I would still see the holes of empty space.  I placed the top coat to smooth the gradient but those little holes where still present.  I applied China Glaze Fairy Dust to try and cover the holes.  It kind of worked.  I stamped some palm trees and sealed with top coat.  If you look closely to my thumb you can see the little Swiss cheese holes the sponge makes.

Nail Art Polish Beauty tips for Women 408Nail Art Polish Beauty tips for Women 409Nail Art Polish Beauty tips for Women 410

I was not pleased with this manicure at all.  It looked like a hot mess.

Here are my final thoughts about the Avon Nail Art Sponge Kit.  I would not recommend this product nor would I purchase it again.  I think the idea is a good one but the execution is all wrong.  The sponge is not a sponge but rather foam.  The foam is not dense which causes holes plus it soaks up the polish a lot.  I could not reuse the foam for another manicure because the nail polish had soaked up to the middle of the foam.  So even if I cut the part with the dried polish off I have the issue that the foam no longer has the depth it needs to fit properly in the holder.

I give the Avon Nail Art Sponge Kit zero brains. BRAINrate0