Who doesn’t love beauty product reviews and if it is about nails even better. I’m reviewing the French Tip Dip (Signature Deluxe). I love French Manicures but have never been able to do them properly at home. I had come across French Tip Dip and decided to purchase it. The French Tip Dip is described on their site as “Multiple sized tips for quick and easy French manicures and pedicures. Perfect for natural & artificial fingers and toes”. The service I received was great and the delivery of my kit was fast.
 The set comes nicely packed in its own case which is very convenient. Here is what you get in the Signature Deluxe pack: French Tip Dip tool, a file (100/100), manicure stick, 2 dip jars, Bright White tip polish, Sheer Genius base coat, 3 min. Topcoat and instruction card.
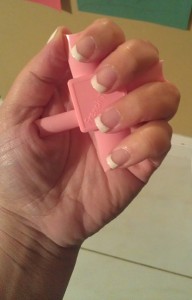
 The directions are straightforward and they have videos showing the whole process on their webpage. It seemed very easy but with everything there is a learning curve. You can’t press down on the nail, rather you kind of glide it over the nail which can take a bit of getting used to. It is suggested to squeeze the tip or even cut it to better fit your nail shape; I overly squeezed the tip trying to get a better fit to the curvature of my nail which ended up giving the french tip more of a “v” shape rather than a rounded one but I don’t mind that. The process was fast and simple.
I loved their polish, the white was just right and the sheer base coat was amazing. You apply the sheer base coat after doing the white tip and it does not dull the white at all.
For the cleanup, I poured the polish back into the bottle and wiped up the jar. I let the polish dry on the tool and just scrapped it off afterwards, which was also one of the recommendations. I found doing my dominant hand a bit more tricky but that is always the case.
The French manicure came out lovely and I was truly impressed by how easy it was. Best part is you can use any polish with this product.
I give the French Tip Dip (Signature Deluxe) 5 brains.
So head on over to https://www.frenchtipdip.com/ to purchase your kit and start on the road to perfect French manicures. Don’t forget to join them on Facebook (https://www.facebook.com/FrenchTipDip), twitter (https://twitter.com/frenchtipdip) and instagram (http://instagram.com/frenchtipdip) where you can find special promotions, contest, how to instructions, and great nail art inspiration using their product.

